WORKIN' MAN

Welcome to the Precious Metals Bug Forums

Welcome to the PMBug forums - a watering hole for folks interested in gold, silver, precious metals, sound money, investing, market and economic news, central bank monetary policies, politics and more. You can visit the forum page to see the list of forum nodes (categories/rooms) for topics.

Please have a look around and if you like what you see, please consider registering an account and joining the discussions. When you register an account and log in, you may enjoy additional benefits including no ads, market data/charts, access to trade/barter with the community and much more. Registering an account is free - you have nothing to lose!

Newmisty

Yellow Jacket
GIM2 Refugee
Messages
1,408
Reaction score
1,931
Points
248
Location
Beyond the Three Realms
New version of the old version. I'll post job related pics when time permits and all craftsperson related stuff warmly welcomed!
I'll start us off on a Project Farm vid testing various blowers. Though rakes rule as my lost friend andial would agree.

How do you enlighten?

You lighten up!


Here's a salvaged WM post from this summer:
I painstakingly stripped all the epoxy off the small bar (ended up using a torch to burn a bunch of the epoxy to make removal easier) sanded to 220, made the bottom the top, restained it and coated it with 5 coats of spar urethane with couple 400 grit sandings in between/ b4 last coat)

B612_20220617_070714_758.jpg

Screenshot_20220617-070024_Gallery.jpg

Screenshot_20220617-070044_Gallery.jpg
 
A young couple was staying at a country cabin retreat near a pristine lake. While staying at the retreat they became friendly with the handyman who lived on site. We remarked how incredible the area was. "My friend has a nice little cottage for sale just down the road about 2 miles in case you're interested in buying something in the area," he told us.
Despite its run-down appearance, we fell in love with the place and promptly bought it "as is."
The day we moved in, our new friend dropped by. "You got a pretty good buy, " then he admitted. "Cottage needs some work though... The roof leaks in several places, the plumbing's shot and the well runs dry during the summer."
Dismayed, I retorted, "Why didn't you tell us that before we bought it?"
"Weren't neighbors then," he replied
 
That time I cleaned my Leatherman after finding it buried in my front yard after being lost for 2 years. It was caked full of mud and rusty.

The first pic is actually after having spent 15 minutes or so cleaning it.

Overall I probably spent over an hour of intense cleaning to get it purty again.

Screenshot_20201207-181604_2.pngScreenshot_20201208-193308_2.pngScreenshot_20201208-193304_2.pngScreenshot_20201208-193239_2.png
 
So I saw a trailer on craigslist Monday night for $600 and jumped on it that night through email and yesterday morning drove just over the border of Oklahoma and quick snatched it up knowing I could double my $ fairly easily.

The fargin thing was 8' x 24' just measuring inside the bed!

So today I made a trailer chopper off-er out of my laser pointer and Buck's battery doohickey that I borrowed while he wasn't looking.

Afterwards it felt like trimming off one of those annoying fingernails that's grown too long.

Cut off 6' of trailer so I had a pile of 6' PT 2'x12"s by which I used 2 to finish off the missing deck areas. His layout of the boards (frame) and fastener placement is a bit cattywompus so I'll probably fix that.

Gonna consult with my welder buddy about back details. Likely build a ramp and maybe even sloped back like a car hauler, not sure yet.I may keep it for a while but we'll see.

Screenshot_20221101-152658.png

Screenshot_20221102-192742~2.png

Screenshot_20221102-191645~2.png

Screenshot_20221102-192507~2.png
 

JLC Online
Training the Trades
Framing Square Basics: Octagon Layout
By John Carroll

DOWNLOAD THE PDF VERSION OF THIS ARTICLE. (367.79 KB)
Not too many octagonal—or eight-sided—houses are built these days, but for a brief period of time between 1850 and 1870, this was a popular architectural style; early Quakers in southeastern Pennsylvania are known to have built octagonal stone school buildings as early as 1760. Nowadays, if you are asked to frame an octagonal structure, it will most likely be a gazebo or a cupola, or perhaps a turret-style addition. You may also be asked to install an octagonal window and so would need to know how to frame the rough opening.


Carpenters have called the octagon “the poor man’s circle” because it approximates the shape of a circle without the problems of bending wood or cutting glass along curved lines. The cuts required to build an octagon are simple cuts, consisting of 90-, 45-, and the occasional 22 1/2-degree angles. So, once you get the layout completed, the building process is straightforward.

The layout of an octagon, on the other hand, is a bit more involved. It is certainly more challenging than laying out a circle or a rectangle, but it’s not as complex as it might seem at first glance. As I’ll show here, you can use a framing square to lay out an octagon up to 67 inches wide without doing any math at all, and to lay out larger octagons using only one simple multiplication computation.

Octagon scale. On the tongue of a traditional framing square are a series of lines, dots, and numbers, all of which have bewildered generations of carpenters. Although it is by no means apparent, those symbols make up the octagon scale.

The scale is made up of 67 equally spaced increments. (Some newer squares have only 65 increments because the manufacturer has used the space historically occupied by the last two dots to label the mysterious scale with the words “octagon scale.”) Most of the increments are marked with a dot. But every fifth increment is marked with a vertical line and a number; that’s how the increments numbered 5, 10, 15, 20, and so forth are represented. The increments are 0.2071 inch long, which is exactly one-half the length of the side of an octagon that is 1 inch wide. As you’ll see, for every inch of width of the octagon being laid out, one of these increments will be required.

Click to enlarge

Along with various other scales and tables, a standard framing square also includes a useful octagon scale on the tongue of the square. The scale shown here consists of 65 0.2071-inch-long increments, a measurement that is equal to one-half the width of one of the sides of an octagon that is 1 inch wide. As shown in the drawing, the ratio of the width of an octagon to the length of one of its sides is 1 to 0.4142.
Math-free layout. To see how this works, let’s say you need to frame an octagonal rough opening that’s 31 inches wide for a 30‑inch octagonal window. Begin by framing a square opening that’s 31 inches by 31 inches. Now, find and mark the center of each side. From each center point, measure and mark in both directions a distance that’s equal to 31 increments on the octagon scale.

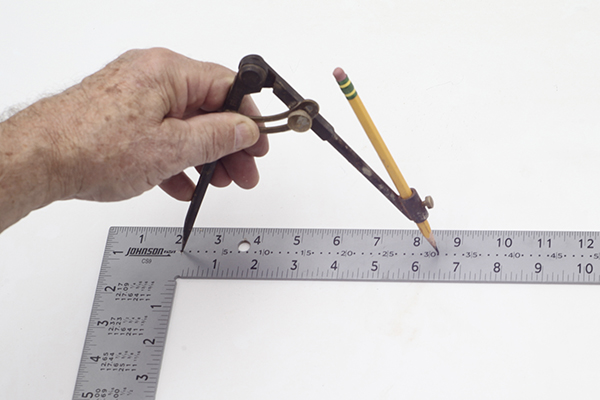
I like to use my divider for this task. I place one leg of the divider at the first line at the beginning of the scale and the other at the dot representing 31. I lock the divider at this setting, then use it to step out and mark in both directions from the center marks on the four sides of the window opening. These marks represent the eight corners of the 31-inch octagon. All that remains is to measure, cut, and install the four diagonal pieces.

Click to enlarge

To lay out a 31-inch-wide rough opening for an octagonal window, the legs of a divider have been set to the “31” increment on the octagon scale, which measures 6 7/16 inches.
Click to enlarge

The divider is then used to mark the corners of the octagon within the 31-inch-wide rough opening, as shown above. Each side of the octagon measures 12 7/8 inches.
The divider, of course, is not essential. You can use a tape measure, a ruler, or just a strip of wood to take and transfer the measurement. The measurement you need to step out from the center point, by the way, is a hair shy of 6 7/16 inches. And the length of each side—and also of the diagonal pieces—is double that, which is 12 7/8 inches.

You can use the octagon scale to lay out octagons larger than 67 inches, but it’s easier to use math. If you need to lay out a 12‑foot (144-inch) octagon, for example, you could set a divider to 48 on the scale and then step it out three times from the centerline to lay out the 144 octagon-scale increments. But as shown in the example above, it would be easier to simply multiply 144 by .2071 to find the dimension needed in inches. That dimension, by the way, is 29.82, or 29 13/16, inches.

Click to enlarge

For octagons larger than 67 inches, find the length of one-half of one of its sides by multiplying its width by 0.2071. For a 12-foot-wide octagon, for example, that dimension is 29 13/16 inches. Each side of the octagon will measure 59 5/8 inches.
Photos by Mathew Navey; illustrations by Tim Healey.

About the Author
John Carroll
John Carroll, author of Working Alone, is a builder who lives and works in Durham, N.C.
 
The trailer bed make a great workbench for fixing up the bikes. Today I finally got the purple and green Trek road worthy after being gifted it from a client last year.
Screenshot_20221106-180302.png
 
A little kitchen project that my wife and I did in 2021. Every year we were in the habit of spending 10 days at an all-inclusive in Negril. Well, the Chinese Sniffles put a damper on that. Air travel was already about as much fun as a root canal and add in all the vax bullshit we just decided to not go. Not getting a mystery shot just to be able to fly. 😵 So we decided to give our tired and dated kitchen a face lift instead.

Ordered a pile of cabinets from one of those places where you have to assemble them yourself. They came flat packed and the first one took an hour and fifteen minutes to put together. We managed to do the rest in about forty minutes each. Used wood glue in addition to their fasteners for robust assemblies. Thank goodness that I am a woodworker, or we wouldn't have had all the clamps that were needed to make assembly easier. The cabinets all have soft close hinges and slides, all the drawers are dovetailed, and all the cabinets have pull out bottoms with soft close slides as well. Took us four days to put them all together and get them staged in the living room until they were needed. With that done we were able to demolish the kitchen. That took six hours and filled a pickup truck.

kitchen1.jpg


Time to install the new cabinets and get the granite people out for measurements. We lived like we were tent camping for nearly three weeks waiting for the granite to arrive. Here is the kitchen with the new cabinets and granite, but no tile backsplash yet. She Who Must Be Obeyed couldn't decide what she wanted for tile. Meanwhile I got three coats of paint on the window frames.

kitchen2.jpg


Here's a shot of the tile the boss finally chose. Fussy to get it all right around all the outlets and windows, but fortunately I own a tile wet saw and I took my time and soldiered on through. Took me four or five days to get it all laid and grouted, but she was pleased with the results.

Total outlay for the remodel was $9k with half of that being the granite.

kitchen3.jpg
 
A little kitchen project that my wife and I did in 2021. Every year we were in the habit of spending 10 days at an all-inclusive in Negril. Well, the Chinese Sniffles put a damper on that. Air travel was already about as much fun as a root canal and add in all the vax bullshit we just decided to not go. Not getting a mystery shot just to be able to fly. 😵 So we decided to give our tired and dated kitchen a face lift instead.

Ordered a pile of cabinets from one of those places where you have to assemble them yourself. They came flat packed and the first one took an hour and fifteen minutes to put together. We managed to do the rest in about forty minutes each. Used wood glue in addition to their fasteners for robust assemblies. Thank goodness that I am a woodworker, or we wouldn't have had all the clamps that were needed to make assembly easier. The cabinets all have soft close hinges and slides, all the drawers are dovetailed, and all the cabinets have pull out bottoms with soft close slides as well. Took us four days to put them all together and get them staged in the living room until they were needed. With that done we were able to demolish the kitchen. That took six hours and filled a pickup truck.

View attachment 2633


Time to install the new cabinets and get the granite people out for measurements. We lived like we were tent camping for nearly three weeks waiting for the granite to arrive. Here is the kitchen with the new cabinets and granite, but no tile backsplash yet. She Who Must Be Obeyed couldn't decide what she wanted for tile. Meanwhile I got three coats of paint on the window frames.

View attachment 2634


Here's a shot of the tile the boss finally chose. Fussy to get it all right around all the outlets and windows, but fortunately I own a tile wet saw and I took my time and soldiered on through. Took me four or five days to get it all laid and grouted, but she was pleased with the results.

Total outlay for the remodel was $9k with half of that being the granite.

View attachment 2635
Sexy granite. What's the variety?
 
Sexy granite. What's the variety?

It's called Saturnia. Comes from Brazil. Here's the actual slab we picked out in the stone place. Paid for it on the spot and they put our name on it and that's the slab they cut up for us. Very pleased overall with the granite people. Place called Pyramid Granite out of Springfield, VA.

kitchen4.jpg

I was leaning towards something solid black, but the boss saw this and, needless to say, vetoed me. :ROFLMAO:

Here are the assembled cabinets piled up in my living room. Also, a shot at one of the pull-out cabinet bottoms. Every cabinet has a pull-out bottom to make getting to the stuff in the back easier. Everything is soft-close. Even the pantry has pull-out drawers. So nice to be able to pull out the entire spice drawer and be able to see what is in the back.

kitchen5.jpgkitchen6.jpgkitchen7.jpg

kitchen8.jpg
 
Saw an ad on CL in Free section with a bunch of crap including a metal bed frame. It was close to me so I drove over there and ended up grabbing an exercise bike thingy(metal parts for projects)a vacuum and an old Whirlpool dehumidifier.

The vac and dehumidifier had been sitting outside for a while but took em to practice on. Figured I'd see if I can fix em and worse case I have a machine to scavenge from after tearing apart(fun learning for me)

So I started by opening the tailgate rolling the dehumidifier out and plugging it in. Nothing. Not surprised, had rust on the cooling slots from being outside. I took off the clamshell and revealed the electronics. No sh!t stains or obvious breaks anywhere. But the noticed the ground was crusty as frig. So I took off the ground and sure enough, green/white death all over her. So I grabbed a tiny bit of sandpaper and cleaned her off, screwed it back on, hit the whole unit with compressed air and plugged it back in....it verks! Let it run a bit and sounds good! So I hit the rust with sp and shot with rust reformer.

Next grabbed the vacuum. Looks in good shape so I thought it probably fire up. Blew it off and out with air and picked some thread out of the brush assembly Plugged it in and got nothing. Set the vac aside and went back inside for a couple more tools needed to work on the trailer and bed frame. When I walked back out I must have stepped in the plug because all of a sudden, the frikkin vacuum fired on out of nowhere! Loud as frig but sucked up dirt from the truck bed. Cool 2 for 2.
Screenshot_20221110-100237.png

Screenshot_20221110-100336.pngScreenshot_20221110-100442.pngScreenshot_20221110-100709.png
 
You're as bad as I am scavenging like that. :p Here's an old grinder I picked up for $25 at a yard sale. Extremely heavy - it was all I could do to get it in my truck. But it's an old Milwaukee and made in the USA. The switch is long gone and someone jury rigged a cord up to it. I bought a new switch and am just getting around to wiring it up correctly. It needs new wheels, and both pieces of glass are cracked, but nothing I can't fix. It runs well and I figure with a little cleaning up it will last me the rest of my life.


grinder1.JPGgrinder2.JPGgrinder3.JPG
 
In the meantime took two trailer wheels off to freshen up.

Took a wire brush on the drill to hit the rust off then hit with carb cleaner.

Found a frying pan the right size and layed it on some tar paper to make a tire mask for the spray paint and hit the wheels with rust reformer. Today I'll pop off the other two and get the prepped and top coat then with black lacquer.

Drilled out rivets holding the frame I wanted and it'll be perfect for covering the end grain on the back of the trailer. The drill bit I was using was cutting well on the outside but the center wasn't cutting and chips so used a self tapping screw on the impact driver to cut away the center before following with the larger bit. Worked like a charm! The extra bed frames parts will be perfect for using on the bottom of a homemade rolling tool cabinet/cart.

Screenshot_20221110-102305.png
Screenshot_20221110-101021.pngScreenshot_20221110-101136.png
Screenshot_20221110-102043.png
Screenshot_20221110-101957.png
Screenshot_20221110-102021.png
 
It's called Saturnia. Comes from Brazil. Here's the actual slab we picked out in the stone place. Paid for it on the spot and they put our name on it and that's the slab they cut up for us. Very pleased overall with the granite people. Place called Pyramid Granite out of Springfield, VA.

View attachment 2638

I was leaning towards something solid black, but the boss saw this and, needless to say, vetoed me. :ROFLMAO:

Here are the assembled cabinets piled up in my living room. Also, a shot at one of the pull-out cabinet bottoms. Every cabinet has a pull-out bottom to make getting to the stuff in the back easier. Everything is soft-close. Even the pantry has pull-out drawers. So nice to be able to pull out the entire spice drawer and be able to see what is in the back.

View attachment 2639View attachment 2640View attachment 2641

View attachment 2644
I'm a big fan of Black Galaxy granite
 
You're as bad as I am scavenging like that. :p Here's an old grinder I picked up for $25 at a yard sale. Extremely heavy - it was all I could do to get it in my truck. But it's an old Milwaukee and made in the USA. The switch is long gone and someone jury rigged a cord up to it. I bought a new switch and am just getting around to wiring it up correctly. It needs new wheels, and both pieces of glass are cracked, but nothing I can't fix. It runs well and I figure with a little cleaning up it will last me the rest of my life.


View attachment 2655View attachment 2656View attachment 2657
Shes a skookum choocher! Don't make em like that anymore!
 
I did a commercial renovation for a young photographer. This was fun because I had a lot of design input. My thought was to recycle the old office windows and throw them into the walls as transoms. Another calling card of mine is using T&G wood as an accent wall. In this case I took what was the old office window and put it in their office wall which they then put their logo onto. I did the same on what became the viewing room mostly for extra light.

Also gutted the bathroom and installed client purchased tile and fixtures.

cf1.jpg

cf2.jpg


cf3.jpg

cf4.jpg

cf5.jpg

cf7.jpg

cf8.jpg
 
Here's an example of the importance of proper home maintenance I often site to people.
On this job( well the prior job to this one) was hired here to install a new, large casement window in this old cottage kitchen to accommodate putting the house on the market for sale. As I was cleaning up from the completed window installation, I noticed little purple paint flecks on the ground behind the house. Like Hansel following a trail of breadcrumbs I was led to the purple corner board on the ground floor at the back of the house.
Gave it a look and a few pokes with a finger and long story short, what could have been $50 gutter repair turned into a $9000 one.
It was literally caused by minor dripping on the backside of the upper downspout connection and could have been prevented with hiring a pro and not paying some shmoe $20 to spew some caulk here and there.

Nancy 3 rot repair 1 (4).JPGNancy 3 rot repair 1 (20).JPGNancy 3 rot repair 1 (15).JPGNancy 3 3 26 06 (5).jpgNancy 3 4 (3).JPGNancy 3 Final.JPGa
 
That time I cleaned my Leatherman after finding it buried in my front yard after being lost for 2 years. It was caked full of mud and rusty.

The first pic is actually after having spent 15 minutes or so cleaning it.

Overall I probably spent over an hour of intense cleaning to get it purty again.

View attachment 1636View attachment 1639View attachment 1638View attachment 1637
I can report on their stance for warranty:

I managed to bust my Wave Leatherman cutting barbed wire. Asked them if they had a warranty. They asked me for the model type and I told them.

"We don't make that style anymore. We will send you an upgraded model." And they did.

Apparently, their warranty is forever.
 
I can report on their stance for warranty:

I managed to bust my Wave Leatherman cutting barbed wire. Asked them if they had a warranty. They asked me for the model type and I told them.

"We don't make that style anymore. We will send you an upgraded model. And they did."

Apparently, their warranty is forever.
Since that pic one the pliers pieces broke (snapped off) I should try that. Thanks for the heads up
 
Helping out my welder buddy...he's got a skookum as frig metal cutting circ saw. Never heard of the brand before. Was told it's a $500-600 tool. Saws through 3/16th plate like butter.Screenshot_20221222-224827.pngScreenshot_20221222-224614.pngIMG_20221222_170220496~2.jpg
 
Back
Top Bottom